
Getting started
How to connect your exchange to a crypto trading bot safely
To connect an exchange to a crypto trading bot, you give the bot a trading key: a key that can place and cancel orders on your account but can't send your money anywhere. On MyLiquidBot you either create that key with one wallet signature (Quick Connect) or paste one you created on the exchange, and then you activate trading. Your funds never leave your exchange account. This guide walks through every step and the errors beginners run into most.
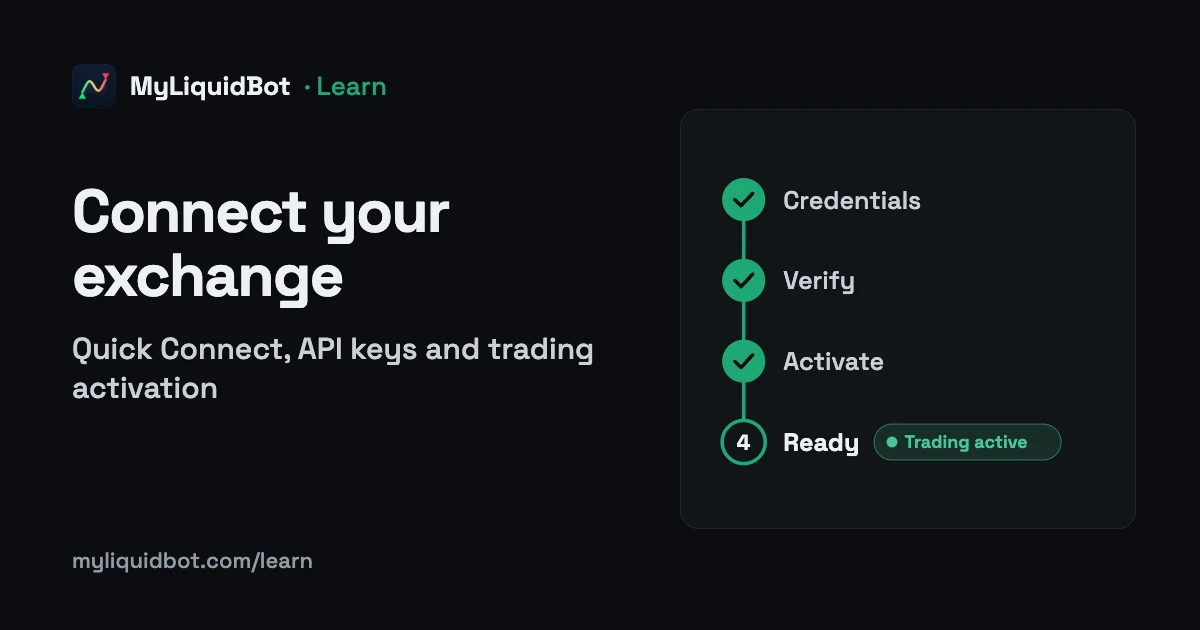
- Your funds stay on the exchange. MyLiquidBot trades with a key that places and cancels orders but can't send your money to another address.
- Quick Connect creates that key with one wallet signature on Hyperliquid, Lighter, Lighter · Robinhood Chain, Aster, Arcus, TxFlow, RISEx and Papertrade. On Bitunix and Ondo Perps you paste an API key from the exchange; on Pacifica you connect your Solana wallet.
- A saved connection isn't always ready to trade. On most exchanges the last step is trading activation, one more signature.
What you need before you start
- A crypto wallet you control: MetaMask, Rabby or another wallet that works with WalletConnect, or a Solana wallet such as Phantom for Pacifica. It signs your approvals. Its seed phrase never goes into MyLiquidBot or any form.
- A funded account on the exchange, in the collateral it uses: USDC on Hyperliquid, Lighter and Pacifica, USDG on Lighter · Robinhood Chain, usually USDT on Aster and Bitunix futures. Without a deposit a connection can be verified, but it can't open positions.
- A MyLiquidBot account, created with email and password, Google or your wallet. See Create an account.
On Hyperliquid, Lighter and Lighter · Robinhood Chain, the exchange account must have been created with your own wallet. Accounts opened with email, Google, Apple or another social login aren't compatible: open a new one with your wallet.
Some exchanges add conditions of their own. A Bitunix account has to be created through the MyLiquidBot registration link (see the Bitunix guide), and Arcus and TxFlow may ask for an invite or access code before you can trade.
What MyLiquidBot can and can't do with your account
MyLiquidBot never receives your wallet's private key or seed phrase, and your funds never move to MyLiquidBot. It trades through a separate trading key, which exchanges call an API wallet, an Agent Wallet, an agent or a session key. Your wallet authorizes it once. From then on the key can send orders for your account, and that's all it's for.
What the trading key can do
On Bitunix and Ondo Perps the trading key is a regular exchange API key. You create it yourself with read and trading permissions and leave withdrawals off: MyLiquidBot doesn't need withdrawal permission on any exchange. Whatever you paste is stored encrypted.
Quick Connect or your own API key?
Where the exchange supports it, Quick Connect is the simplest way: MyLiquidBot creates the trading key and your wallet authorizes it with one signature. There's nothing to copy, no funds move and you pay no gas. If you'd rather create the key yourself on the exchange, choose Paste API key. The last column is what trading activation asks for, explained further down.
| Exchange | How you connect | Trading activation |
|---|---|---|
| Hyperliquid | Quick Connect or Paste API key | Builder Fee, signed with the wallet that owns the account |
| Lighter | Quick Connect or Paste API key | Integrator Fee, signed with the wallet saved in the connection |
| Lighter · Robinhood Chain | Quick Connect or Paste API key | Integrator Fee, signed with the wallet saved in the connection |
| Aster | Quick Connect or Paste API key | Builder Fee, signed with the main wallet |
| Pacifica | Your Solana wallet | Two signatures: one creates the Agent Wallet, one approves the Builder Fee |
| RISEx | Quick Connect or Paste API key | Approve Builder fee in Manage, signed with the RISEx API Wallet |
| TxFlow | Quick Connect or Paste API key | Builder Fee, signed with the TxFlow wallet saved in the connection |
| Arcus | Quick Connect or Paste API key | None |
| Papertrade | Quick Connect | None |
| Bitunix | API key created on Bitunix | MyLiquidBot support activates it after verification |
| Ondo Perps | API key created on Ondo Perps | None |
How to connect with Quick Connect
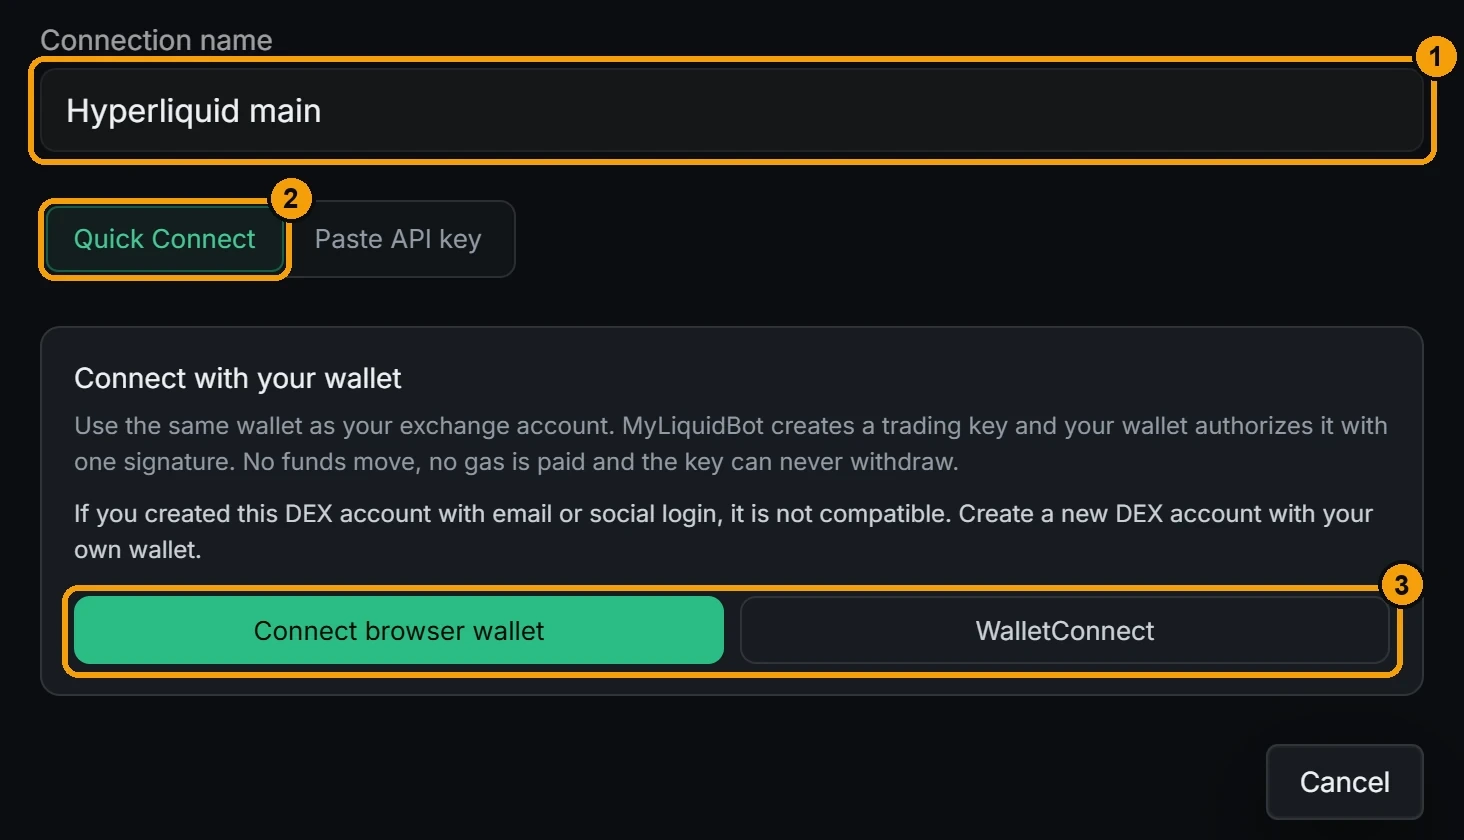
- Open Account → Exchanges → Add connection, choose your exchange and give the connection a name you'll recognize later.
- Leave Quick Connect selected and press Connect browser wallet or WalletConnect. On Arcus you can enter a subaccount first; leave it blank for the main account.
- Sign with the wallet that owns your exchange account. MyLiquidBot creates the trading key and the exchange links it to your account. On RISEx, accept if your wallet asks to add or switch to the RISE Chain network.
- Finish trading activation when the wizard asks for it, as described below.
Keys that expire
Some Quick Connect keys have an end date: 179 days on Hyperliquid, Aster and Arcus, 180 days on RISEx and 30 days on Papertrade. Manage shows when the key expires, and you renew it there with one more signature. On Hyperliquid, Aster, Arcus and RISEx, MyLiquidBot also notifies you 14, 7 and 1 day before. Once a key has expired, that connection's bots can't send orders.
How to connect with an API key you create
- Create the key on the exchange, following the guide for your exchange in the table above. Give it permission to trade (and to read, on Bitunix and Ondo Perps), never to withdraw. On Lighter, don't create a maker-only key: it can't send every type of order.
- Save the private key or secret straight away in a password manager. Hyperliquid, Lighter, RISEx and Arcus show it only once. If the exchange asks for a validity period, note the end date: the connection stops trading when the key expires.
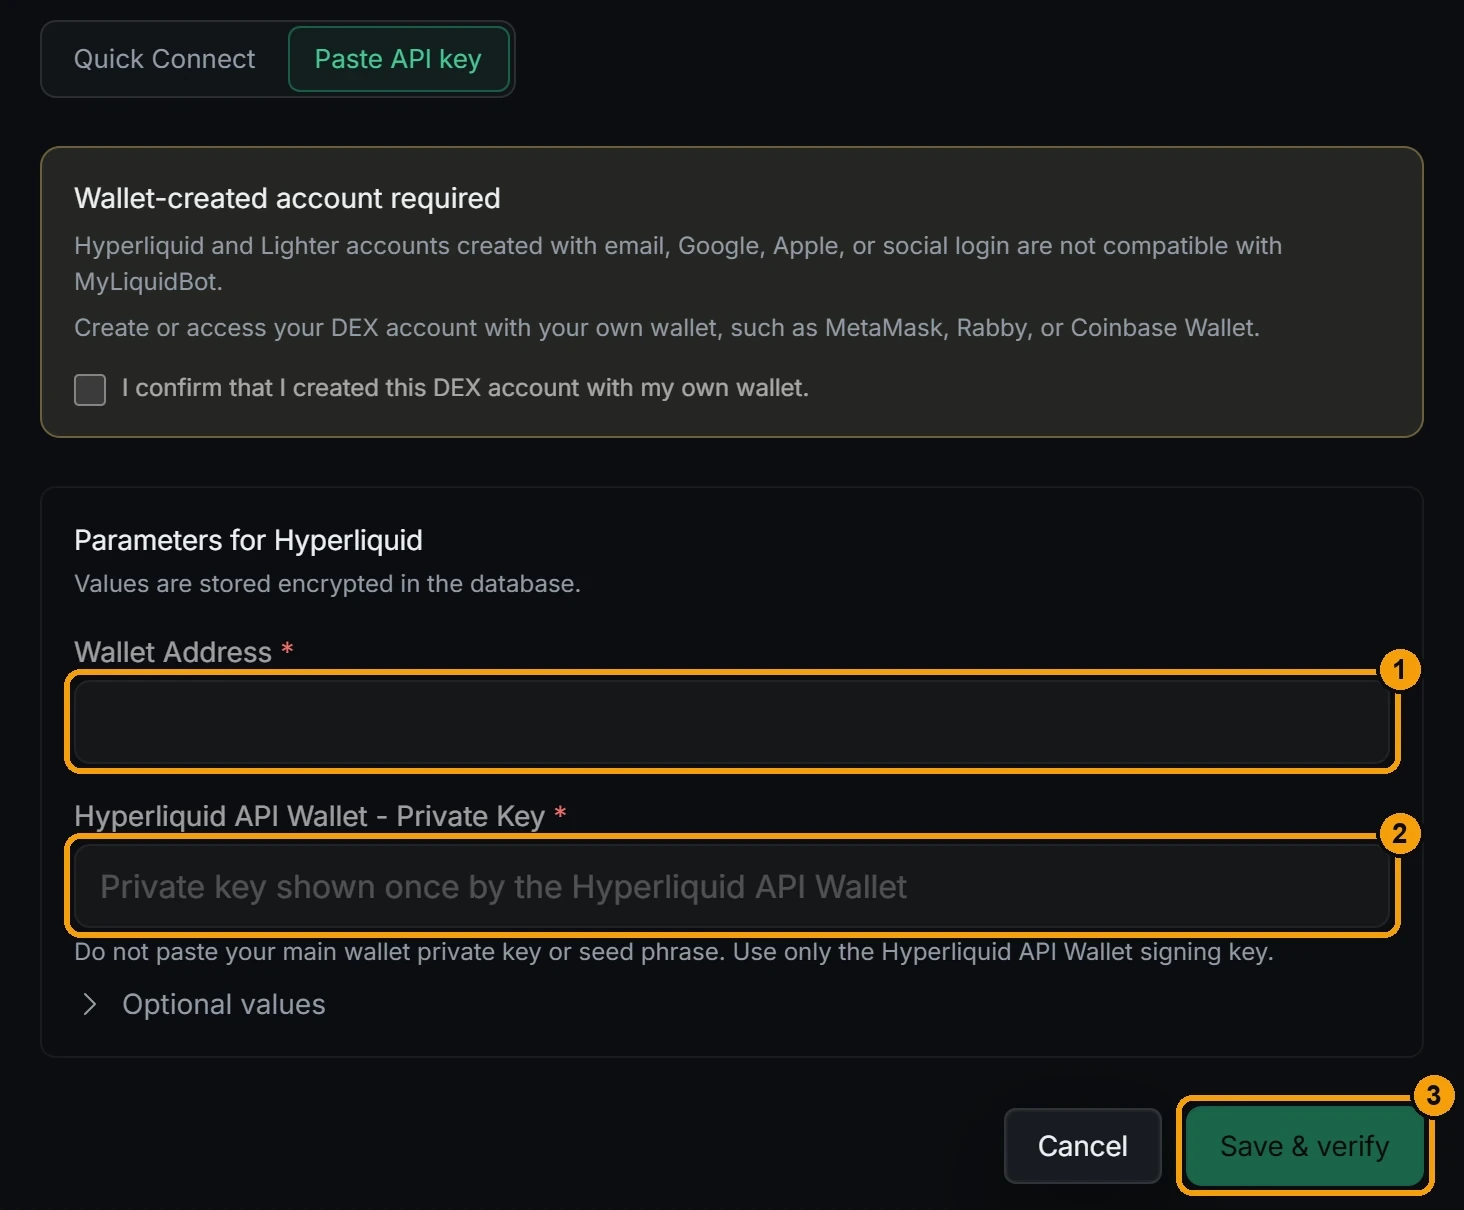
- In MyLiquidBot, open Add connection and choose the exchange. If Quick Connect is offered, switch to Paste API key; on Bitunix and Ondo Perps the fields appear straight away. Paste each value into its own field. A field that asks for a wallet or account address wants the account you trade from, not the API wallet's own address. Aster asks for both, in separate fields: User Address and API Wallet Address.
- On Hyperliquid, Lighter and Lighter · Robinhood Chain, tick “I confirm that I created this DEX account with my own wallet.” Save & verify stays disabled until you do.
- Press Save & verify, then finish trading activation.
Pacifica works a little differently. Press Connect Solana wallet (or paste the address of your Pacifica account), leave the Agent Wallet fields under Advanced parameters empty and press Save & verify. MyLiquidBot creates the Agent Wallet during activation, so your main wallet's private key never enters MyLiquidBot.
Activate trading: the step that's easy to miss
The connection wizard has four steps: Credentials → Verify → Activate → Ready. On most exchanges your bots can't trade until Activate is done.
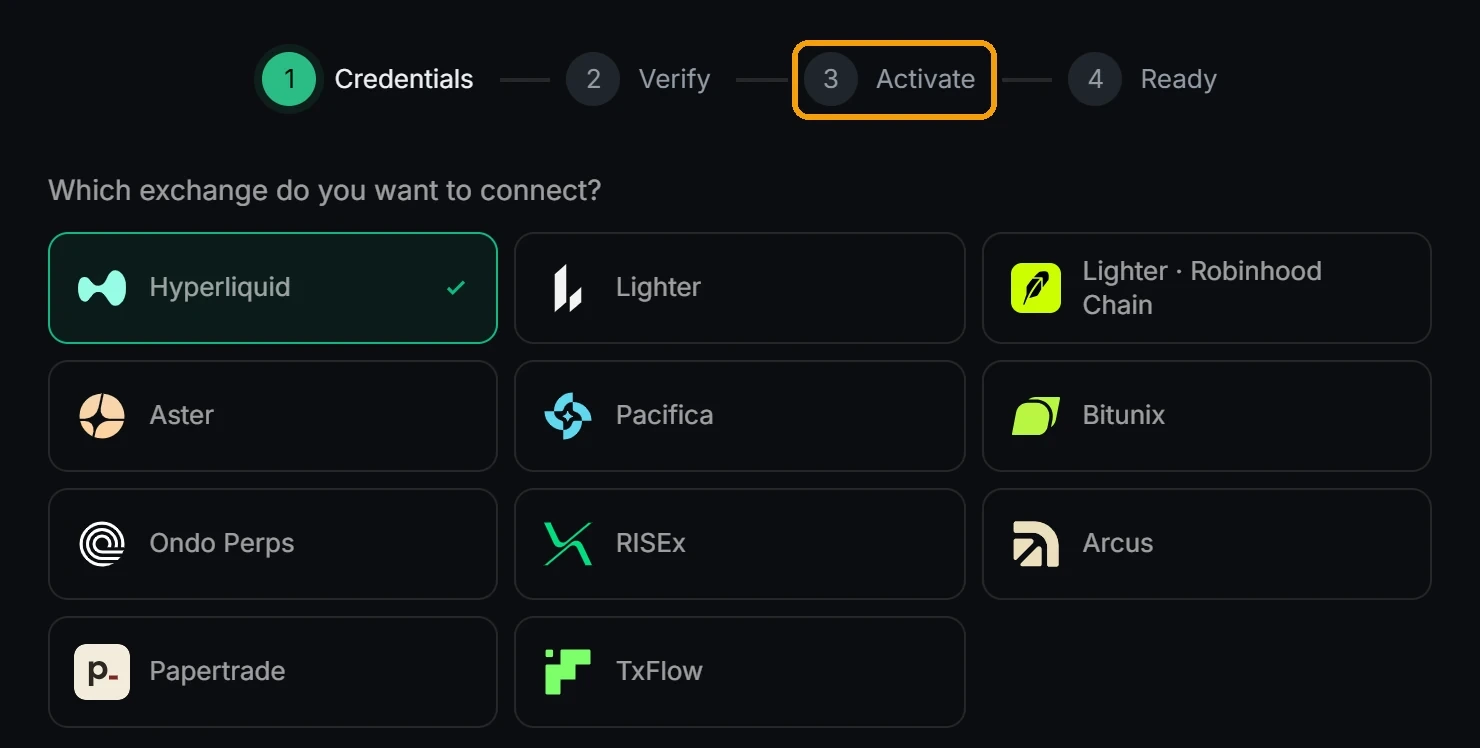
Activation is usually one more wallet signature that approves the MyLiquidBot fee. Exchanges call it a Builder Fee or an Integrator Fee; both mean that MyLiquidBot may charge its fee on the orders it sends for you. The rate in the signature is the most that can be charged; what you actually pay is the fee on the Fees page, with your plan's discounts. It isn't a transfer: no gas, no money leaves your account and it gives no right to withdraw.
- Hyperliquid and Aster: Builder Fee, signed with the wallet that owns the account. Hyperliquid only accepts it once the account has a deposit.
- Lighter and Lighter · Robinhood Chain: Integrator Fee, signed with the wallet saved in the connection.
- Pacifica: two signatures with your Solana wallet, one to create and bind the Agent Wallet and one to approve the Builder Fee.
- TxFlow: Builder Fee, signed with the TxFlow wallet saved in the connection.
- RISEx: in Manage, under Builder attribution, press Approve Builder fee. It's signed with the RISEx API Wallet.
- Bitunix: no signature. MyLiquidBot support activates the connection once it's verified: send them the connection name, never the keys.
- Ondo Perps, Arcus and Papertrade: no separate approval.
If you closed the wizard or pressed Skip for now, open Account → Exchanges → Manage for that connection and finish it there. See Builder Fees and Integrator Fees for the details.
How to tell the connection is ready
A connection that can trade shows Active in Account → Exchanges, and Manage shows the approval as done. Then check that your balance appears in Account or Portfolio.
What the status tells you
If something doesn't work
When a step fails, MyLiquidBot shows the exact reason. These are the most common ones:
| What you see | What to do |
|---|---|
| We could not verify your connection | A value is in the wrong field, has extra spaces, belongs to another account or network, or the key expired or was revoked. Check each field against your exchange's guide and paste them again. |
| The wallet signature fails or a different wallet appears | Select in your wallet the account that owns the exchange account, the same one saved in the connection, and sign again. Signature requests expire after a short time, so sign promptly. |
| Hyperliquid rejects the approval | The account needs a deposit first. Deposit USDC on Hyperliquid and try again. |
| The connection is saved but Inactive | Trading activation isn't finished. Complete it in Manage; on Bitunix, support does it. |
| The balance shows 0 | The exchange account has no deposit, or the address belongs to another account. On a standard Hyperliquid account, a perps bot uses the Perps balance: move funds from Spot in the Hyperliquid app (Portfolio → Transfer). |
| The account was created with email or social login | Hyperliquid and Lighter accounts created that way aren't compatible. Create one with your own wallet and connect it. |
| The key expired | Renew it in Manage with one signature (Quick Connect), or create a new key on the exchange and edit the connection to use it. |
Still stuck? The support chat on the Trading Agent page works even before your exchange is connected. You can also write to the Telegram support group with the exchange, the connection name, the exact error message and a screenshot that doesn't show any key. More cases in Troubleshooting.
After you connect
Once your balance appears, create your first bot with a small amount and 1× to 2× leverage, and check that its orders show up both in MyLiquidBot and on the exchange.
Keep your keys out of chats, AI assistants and support groups. Nobody from MyLiquidBot will ask for a private key, a secret, your seed phrase or a 2FA code. If a key may have leaked, pause your bots, revoke it on the exchange, create a new one and edit the connection to use it.
Turn on two-factor authentication in Account → Security. Anyone who gets into your MyLiquidBot account can place orders through your connections, even though they can't withdraw.
Frequently asked questions
Can a trading bot withdraw my funds?
Not on MyLiquidBot. The trading key places and cancels orders but can't send funds to another address; on Lighter a withdrawal can only go back to the wallet that owns the account. On Bitunix and Ondo Perps, keep withdrawals off when you create the API key.
Do I pay gas to connect an exchange?
No. The Quick Connect signature and the fee approvals are signatures, not transfers: no gas is paid and no funds move.
What is a Builder Fee or an Integrator Fee?
The approval that lets MyLiquidBot charge its fee on the orders it sends for you. You sign it once per connection, and again only if Manage asks. It isn't a deposit and never a withdrawal permission. Rates are on the Fees page.
Why does my connection say Active but I can't create a bot?
On Hyperliquid, Aster and Lighter a connection shows Active as soon as it's verified, but bots also need the fee approval. Open Manage for that connection and finish it.
Can I connect an exchange account I created with email or Google?
Not on Hyperliquid, Lighter or Lighter · Robinhood Chain. Create the exchange account with your own wallet and connect that one.
Do I need to renew the connection?
Only when its key expires. Quick Connect keys last 179 days on Hyperliquid, Aster and Arcus, 180 days on RISEx and 30 days on Papertrade; you renew them from Manage with one signature. A key you created yourself lasts as long as you set on the exchange.